Friday, September 25, 2015

Palmer's Coconut Oil Formula Body Lotion & Why I'll Never Wear Aftersun Again


There's something so special about the smell of holidays. You know the one. Whether it's the scent of sun cream mixed with sea air, that heady waft that hits you as you step out of the airport, or drops of vanilla on your skin from hastily licked melting ice cream. The body products we pack in our suitcases can also remind us of holidays: one of mine is Hawaiian Tropic's tanning oil (yes I'm insane) and lazy days by the pool in Tenerife.

I'm a long time fan of Palmer's products- namely their Cocoa Butter Formula body lotion. Being made from mostly natural, and sustainable ingredients and also due to the fact they're cruelty free. So when I saw their new Coconut Oil Body Lotion in Boots (priced at €5.49), I knew it was coming to Portugal with me.


Aftersun Schmastersun
I decided to ditch the aftersun and just use this instead, as all aftersun does is rehydrate skin.
First off the smell is divine. Coconuts and almonds mix together to make a nutty heaven. The scent is also lasting, and I still could smell it (though faintly) after 12 hours.
It's thick, but super easy to apply, and a little does go quite a long way. I found it to absorb quickly, and by the time I applied my hair heat protecting spray I was able to get dressed without everything sticking to me. 
I'm one of those unfortunate people to suffer from dry skin. As I knew I'd be in the sun most of the day, I needed something that would keep my skin really hydrated, and also relieve any redness from sun exposure. Fantastically, this lotion does exactly that. I had some redness on my back and shoulders one evening after my parents abandoned me all day to go to the beach. After two applications of this all traces of red had completely disappeared. I've come home with tanned, healthy looking smooth skin.


The Science Bit
It's made from 100% sustainably sourced coconuts, Tahitian Monoï Oil, and infused with Tiaré flower petals. (Monoï is pronounced mah-noy and it's an infused perfume oil made from soaking Tahitian gardenias, or Tiaré flowers in coconut oil, doncha know). There's also a heap of naturally occurring fatty acids and proteins that helps keep skin plump and looking moisturised. There's also vitamin E oil, which is a great antioxidant, hydrator, anti-inflammatory, and helps protect skin against cell mutation in the sun. 
Sure what more could you want?

I honestly found this to be a brilliant product, and really loved using it.I've been home for a couple of days and am still applying it every night, and plan on repurchasing when this bottle runs out.
So what are your favorite holiday smells? Let me know in the comments below, as I'd love to hear them!
Thursday, September 10, 2015

Is There Anything to Love About Kim's Kardazzle Palette?


I'll be honest, I'm not a Kim Kardashian fan. At all. In fact the entire Kardashian klan (couldn't resist) definitely aren't on my Christmas card list. However, I've heard of Khroma, the line started by Kim, Kourtney, and Khloe, and was definitely excited to try this.

I picked up Kim's Kardazzle Palette, and whoever named it needs to be fired, but nevertheless I'll let it slide.
The palette packaging is undeniably gorgeous: grey snakeskin effect with the Khroma logo in silver on the bottom right hand corner. The lid opens up to reveal a mirror and the eight shadows, while the face powders slide out from the bottom. It's around the same size as a credit card so perfect for travel, and doesn't come with any brushes. Probably a good thing seeing as most palette brushes are rubbish.

This palette contains eight eyeshadows (four shimmers and four mattes), and a blush, highlighter, and bronzer.


None of the individual colours are named, so for convenience I've numbered them 1-8.


They range from a matte light, dove grey to a carbon black shimmer, with teal and navy thrown into the mix. The mattes definitely let this palette down with very little pigmentation. 

1. Matte black. Pigmentation was good, and it applied very smoothly.
2. Light dove grey matte. Absolutely terrible pigmentation, very dry and stiff. Lovely colour, but a pain to use.
3. Charcoal matte grey. I absolutely love this colour, however pigmentation was ever so slightly lacking. Still, it was easy enough to build up, and way creamier than #2.
4. Matte teal. Very similar to #3 pigmentation-wise. Teal was definitely a nice addition to the palette, but not an essential. It honestly looks a lot better in the pan.
5. White shimmer. Awful awful awful. Crumbly, cakey, and the fallout was intense. A lovely highlight colour, but a nightmare to use. It took ages to smooth out and even then, it still looks patchy.
6. Navy shimmer. Definitely one of the best colours in this palette. Smooth, creamy, and so easy to work with. Really helped make up for the disastrous white shimmer.
7. Silver shimmer. Yet again, creamy, easy to apply, and a smooth finish.
8. Black shimmer. Brilliant pigmentation, and would be a real star if it weren't for the masses of fallout. I didn't even apply much product to my brush, and there were little specks flying everywhere. Definitely one to apply before doing the rest of your face 

This palette was designed with smoky eyes in mind, similar to those of Kimmy K. While they definitely have the dark colours and highlights there, I was very disappointed with the lack of transition colours. One nude would have been a welcome addition (or replacement for that darn light grey).

As for the blush, highlight, and bronzer, these absolutely steal the show. Pigmented, easy to apply, and in lovely shades.


Blush. The blush is a very pigmented, vibrant bubblegum pink. It was very easy to build and had a very smooth finish. Due to the vibrancy of it, I'd recommend building up bit by bit (this has clown-cheek syndrome written all over it).
Bronzer. Light terracotta would be the best way of describing the colour of this. It applied lightly but was easily buildable. While the product consistency is good, I'm a bit iffy on the colour. It has a slightly orange tinge to it, so could be a risk on fair skintones.
Highlight. White gold with a hint of champagne, super easy to apply and very pigmented. 

So while the blush and bronzer are in my opinion so- so, this highlighter is HEAVENLY. It's a super useable colour that would suit most skintones and was a total pleasure to use. There's also a gorgeous iridescence (that my camera skills don't do justice to) under certain light. Definitely the star of the palette and I wish it was available separately.

Just look at it! Absolute champagne gold perfection.

Speaking of availability, Khroma is a difficult enough brand to track down Ireland. I was lucky enough to find this in TKMaxx, but have never actually seen it anywhere else. The website names Cloud 10 as a stockists, but it's not in the brand selection there. 
Now I did get lucky and only paid €5.99 for this, but after doing a bit of detective work I found that these usually retail for €16.95. Which I think is a bit of a ripoff. For the quality of the eyeshadows (that damn light grey) I'd be happy to pay €12/ €13 at most for this. 

So what do you think of this palette, or any other Khroma products? Also, I'd love to hear and better (or worse!) possible alternative names for this palette.

Claire x

Saturday, September 5, 2015

MakeUp Brush Guide Part Two: How To Spot Clean Your MakeUp Brushes


'I love cleaning my makeup brushes'.
Said no one ever.
Let's face it, makeup brush cleaning is no one's favorite job. It's time consuming, mind numbing, and repetitive. However the benefits far outweigh the negatives: your brushes have a longer life, makeup application is easier, and the risk of bacteria transfer is lessened. No more mini civilizations living in your brushes!

I have two ways of keeping my brushes lovely and clean: spot cleaning and deep cleaning. In this post I'm going to give a rundown on spot cleaning, as it's an everyday job that doesn't take much time, and does so much good in the long run.

To clean your brushes you'll need:
- brush cleaner (MAC, No7, Crown Brush, Cinema Secrets, MakeUp Forever, Bobbi Brown, BateMonerals. Do NOT use plain rubbing alcohol*)
- towel, kitchen paper, or a face cloth
- small cup with 20ml water
- drying rack or something to keep your brushes vertical/ at an angle
*rubbing alcohol by itself will just dry out your brush bristles and handle over time

For powder products and small to medium brushes: 
Start off by using your chosen brush to apply a product. 
Once you've used a brush, simply squirt a small amount of cleaner onto your clothes or kitchen paper. 
Gently rub the brush back and forth to remove any leftover product. 
Pop your brushes into your drying rack and leave to dry.


For cream/ liquid products: these are definitely a bit trickier. I found MAC cleaner to really under perform in removal when using the powder technique, especially with my 187 foundation brush. 
What I do now is add a squirt of cleaner to the water in your cup, and swirl it around. You can also press it against the edges but be careful to not get liquid high up in the brush so the fibres don't loosen. 
Gently press into the cloth to remove and water, and repeat if necessary. These will take a little longer to dry but it definitely helps prevent product build up.


So that's it! If you clean as you go, it takes absolutely no time at all and can easily be built in to your everyday routine. The best bit? Make up cleansers contain isopropyl alcohol, so dry almost instantly, meaning you can use the same brush again after a few minutes. Winner!

I hope this has helped some of you anyway! Let me know below if you have a different method, or can recommend another brushe cleaner. I've got my eye on the Make Up For Ever one but would love to hear any suggestions!

Claire x

Wednesday, September 2, 2015

Blog Introduction.


Hello!
So most likely you're one of my friends that I've forced into reading this, but if you're not then you're my hero today!

About Me
I'm Claire and I'm twenty-two. I live in Dublin in an apartment with my roommate. His name is Nox and he's my kitten (bet you didn't see that one coming).
I'm a college dropout, aspiring makeup artist, and I've been a professional hoodie folder for four years.

Why Am I Blogging?
I started blogging three years ago, but had a lot going on at the time so decided to stop. Recently I made the decision to take it up again after realizing how much I missed it.
I love makeup, and all things beauty related so am constantly reading different blogs. I wanted to share my thoughts and ideas, after being inspired by so many others.

What This Blog Is About
Beauty reviews, swatches, lifestyle posts,
story time and anything else in between.


MAC Soft and Gentle Review


Today I've decided to review the latest addition to my collection; Soft and Gentle Mineralize Skinfinish by MAC.


To me Soft & Gentle is a bit of an apple pie; Everyone knows it and most people love it. So I'm really feeling a bit late to the party on this one. It works well on most fair to medium skintones as a basic highlight, although darker tones may prefer a more bronze toned highlight. I think MAC's claims of a "gilded peach bronze" may be a tad ambitious. I have (untanned) sallow skin, and swatched I could see champagne and white gold tones, with a light peach frosted sheen. Again, it's definitely at the lighter end of the spectrum.


Now I had originally believed that application would be the easiest thing ever (it's a powder, not rocket science. I can handle it), however I honestly was pretty frustrated during the process. I used my Paul & Joe all over face powder brush (natural tapered bristles), and I don't know if it's the brush or the skinfinish, but I found it really difficult to judge the amount of product I was picking up. I know that sometimes on first use MAC products can seem to have a film over them that needs to be removed before the full effect comes through (Wash & Dry collection I'm looking at you) so I did give it a rub over with a tissue. Even still, I found that until you begin to apply it you can't tell how much you're working with. So in my opinion this something that needs to be built up in light layers. I suppose the plus side to this is being able to create a slight glow and also a very strong highlight. 


At the end of the day I'm not surprised to see so many people absolutely loving Soft and Gentle. It works on most skintones, it's not over the top and yet can be brought up to a more intense finish, and it's a product that gives a natural glow as opposed to something totally artificial. On the other hand it is a very generic highlighter, and didn't blow me away at all. I'd recommend it as a reliable part of any kit, but it's not something I'd reach for first.

Have you tried Soft and Gentle? I'd absolutely love to hear your thoughts!
Claire x

Sunday, August 30, 2015

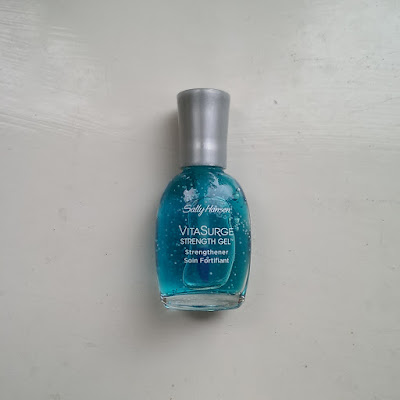
Sally Hansen VitaSurge Strength Gel Review

I guess I should start by saying that my nails are not pretty; never have been and never will be. I bit them, pulled at them, scraped and chipped nail polish off them for thirteen or so years. Nothing could stop me. Stop 'n' Grow was useless. I was an anxious child on a mission, and my nails paid the price. 

That is, until I was seventeen and I decided that I'd had enough. No more short little stubs that looked awful, thanks very much. I wanted long nails and that was that.

Or so I thought.
What I got were weak nails, that broke constantly; either coming straight off or cracking at the sides. I can't count the amount of money I spent or products I tried, to no avail. A month ago things got super bad. Eight out of ten nails broke within a few days of each other, and the ones that didn't were threatening to crack. The ring finger on my right hand looked about to split right down the middle. So after a recommendation from one of the girls in work (my hero) I sped to TKMaxx in search of products from the Nail Goddess- Sally Hansen.

The VitaSurge Strength Gel promises 'a fast absorbing gel formula for weak nails that split and peel. Dries clear. Stronger nails in 5 days. Vitamin C formula for strength and resilience. Multi-active bead infused gel formula instantly releases a surge of nourishing vitamins C and E for stronger more resilient nails. Helps increase flexibility so nails resist splitting and peeling'.
Naturally, after reading that I was sold, and the amazing turquoise colour made it even better. 


Application is simple. Just apply some of the product to your nails- bonus points if you get the little balls (no laughing) and rub it in either with a finger or the applicator. It dries in within two minutes or so, which is perfect for on the go use.


As far as I can tell the little white balls are the vitamins C and E and if you press down on one they break up and disperse. 

Now, I suppose the big question is did it work in five days? For me, no. But after one week of usage every night before bed I did notice a small difference. Now a month later my nails aren't splitting or peeling as much, although the problem hasn't been completely alleviated. Strength- wise I've not noticed a huge difference as my nails were actually pretty strong to begin with.
Possibly for someone with normal nails that  only occasionally break this could be perfect, but if you have severely damaged nails I wouldn't necessarily recommend this.

Have you tried it? If so, let me know and tell me your thoughts.
Claire x

Wednesday, August 19, 2015

Makeup Brush Guide Part 1: Choosing Your Brushes


As Philoctetes in Hercules said: 'A hero is only as good as his weapon'. That being said, a make up artist needs good tools. Brushes are an essential part of any good kit, however, with so many to choose from, it can be difficult to know what you need. The right brush will give you the best finish and maximise the quality of the products you're using. 
Until I learned what brushes different brushes were used for, and what I actually needed, I would mindlessly buy more and more and still find them to not really be right. So I decided to compile this little guide to help you figure out what you need and when you need it.

The Basics

Anatomy of a makeup brush
Almost every makeup brush is made from the head (bristles) and body (ferrule and handle).
Bristles can be natural or synthetic, and the handle can be wood or plastic. The ferrule is the connector between the bristles and handle and is usually metal.


Natural or synthetic?
Choosing between natural or synthetic bristles does make a big difference, believe it or not. Synthetic brushes are slightly more suited to liquid or cream products compared to natural brushes, as the hair is smoother and has less naturally occurring blemishes and doesn't trap products as much. 
Natural bristles are fantastic to use with powder products as they blend them so well, and give a beautiful finish.

Natural: pony, goat, squirrel, sable, horse, badger
Synthetic: acrylic, taklon

Types of Brushes

Makeup brushes can be divided into two main categories: face brushes and eye brushes. 
Eye brushes are an extensive category but can include:
Definer
Smudger
Blender
Pointed liner
Angled liner
Crease blender
Basic eyeshadow
And all can be small medium or large but I think my fingers may fall off if I try to list them all.


So hopefully this has helped break down the endless selection of brushes available for you. If you have any suggestions or comments please leave them below.

Claire x